If there is anything professional guitarist and learners live by, it is the MXR 10 Band EQ pedal. This tool is a great pick for instrumentalists looking for a way to fine-tune a guitar or bass tone
Learning about the MXR 10B and EQ and knowing the appropriate settings to is the best way to make the most out of it. Our guide will take you through the MXR 10 Band EQ and the best settings to apply.
What is an EQ Pedal?
Before we go into the specifics, let’s brush you up with a brief overview of what an EQ pedal is and how it works. As you might already know, EQ stands for “equalizer,” so you can conclude that an EQ pedal stands for “Equalizer pedal”.
This tool allows you to adjust the frequency response of your guitar or bass signal. Using the tool, you can boost or cut specific frequencies to shape your tone to your liking. On the MXR 10 Band EQ, you will find 10 frequency bands to work with. These give you a wide range of tonal adjustments.
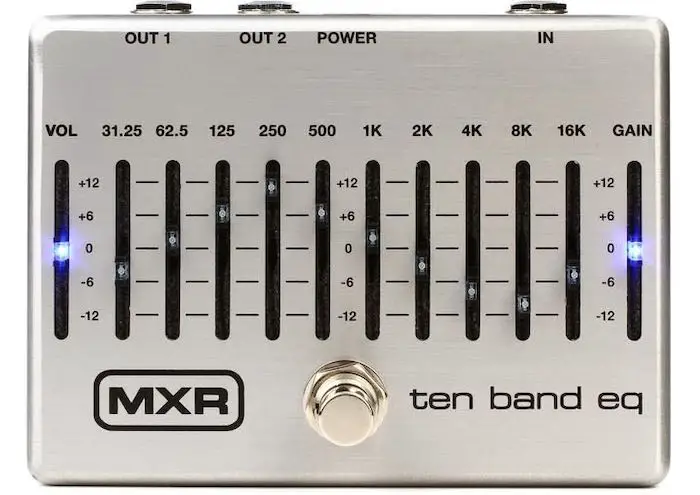
There is also a simple design to the MXR 10 Band EQ, with 10 sliders corresponding to the 10 frequency bands. The frequencies are spaced out evenly, with the lowest frequency (31.25 Hz) on the left and the highest frequency (16 kHz) on the right.
How the MXR 10-Band EQ Works
As said earlier, the MXR 10 Band EQ has ten sliders that control the levels of different frequency bands. These sliders are arranged in a logical sequence, starting from the lowest frequencies on the left and moving up to the highest frequencies on the right. The first slider controls the 31.25Hz frequency band, and the last slider controls the 16kHz frequency band.
Each slider has a range of +/-12dB, which means that you can boost or cut the level of each frequency band by up to 12dB. This is a significant amount of control over your tone, and it allows you to fine-tune your sound to your exact liking.
One important thing to note is that the MXR 10 Band EQ is a graphic equalizer. This means that it applies an equal amount of boost or cut to every frequency within each band. For example, if you boost the 100Hz frequency band by 6dB, every frequency from 50Hz to 200Hz will be boosted by the same amount.
MXR 10-Band EQ Settings
Below we have provided some recommended settings to get you started with this tool.
- Clean Boost: If you’re looking to give your guitar or bass a clean boost, try setting all the sliders to the same level, around 12 o’clock. This will boost your overall signal without adding any specific frequency boosts or cuts. You can experiment with the overall level by adjusting the Output level knob.
- Classic Rock: For a classic rock tone, try boosting the lower frequencies and cutting the higher frequencies. Start by boosting around 100 Hz, 250 Hz, and 400 Hz by 3-6 dB, while cutting around 1.6 kHz and 3.2 kHz by around 3 dB. Adjust the other frequencies to your preference.
- Metal: For a metal tone, you’ll want to boost the mids and cut the lows and highs. Start by boosting around 250 Hz and 400 Hz by around 6 dB, while cutting around 62.5 Hz and 16 kHz by around 3 dB. Adjust the other frequencies to your preference.
- Funk: For a funk tone, you’ll want to boost the highs and mids and cut the lows. Start by boosting around 1.6 kHz and 3.2 kHz by around 6 dB, while cutting around 62.5 Hz by around 3 dB. Adjust the other frequencies to your preference.
- Jazz: For a jazz tone, you’ll want a more balanced EQ. Try boosting around 400 Hz and 1.6 kHz by around 3 dB and cutting around 62.5 Hz and 16 kHz by around 3 dB. Adjust the other frequencies to your preference.
Tips for Settings MXR 10-Band EQ
When it comes to using the MXR 10 Band EQ, there are a few things to keep in mind:
- Start with a neutral setting: Before you start adjusting the frequencies, make sure all the sliders are set to the same level (around 12 o’clock). This will give you a neutral starting point to work from.
- Take it slow: It’s easy to get carried away with EQ adjustments, but small changes can make a big difference. Make small adjustments to individual frequencies and listen carefully to how they affect your tone before making further adjustments.
- Use your ears: Remember that EQ is subjective, and what sounds good to one person may not sound good to another. Use your ears to find the tone that you like, rather than trying to follow a specific set of rules or guidelines.
- Consider your guitar or bass: The tone you get from your EQ pedal will also depend on the guitar or bass you’re using. Different instruments have different tonal characteristics, so keep this in mind when making adjustments.
- Don’t forget about the Output level: The Output level knob controls the overall volume of the pedal’s output. Make sure to adjust this to match the level of your clean signal or to boost your signal if desired.
In addition to these tips, it’s also worth experimenting with using the MXR 10 Band EQ in different parts of your signal chain. Some players prefer to use it before their overdrive or distortion pedals to shape the tone before it hits the dirt, while others prefer to use it after their dirt pedals to fine-tune the sound.
Final Thoughts
If you’re looking for a flexible and simple-to-use pedal that will help you mould your guitar or bass tone to whatever you want it to be, the MXR 10 Band EQ is a terrific option to consider. You must experiment with various settings and use your ears to get the tone you prefer if you want to get the most out of the tool.


