OBS Studio is a great option for pro streamers. It is considered the go-to software for screen recording and comes with a wide range of features that would improve your video and audio performance.
When it comes to using OBS for Twitch, there are various audio settings to consider. To achieve an unforgettable streaming experience, understanding and optimizing your OBS (Open Broadcaster Software) audio settings is paramount.

OBS Audio Settings for Twitch Explained
In this guide, we will go into the details of the best OBS audio settings for Twitch that will make your stream resonate with your audience.
Choosing the Right Audio Devices
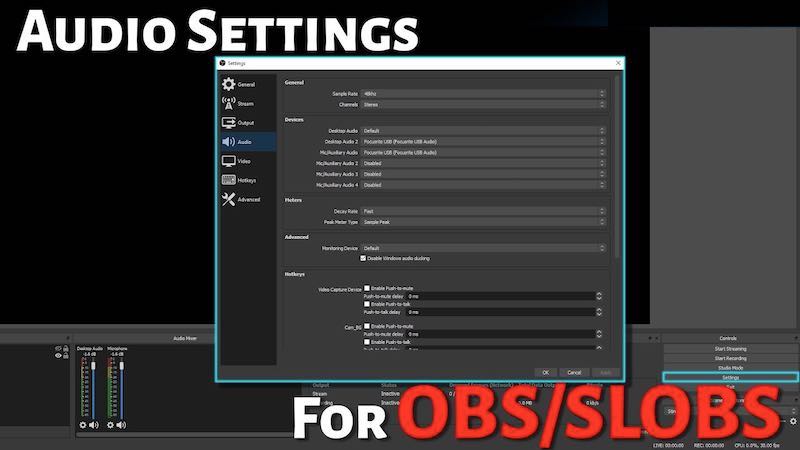
To get the best audio settings, you would want to ensure you have selected the right audio devices to achieve exceptional sound quality. Start by navigating to the OBS settings menu, click on the “Audio” tab, and follow these steps:
- Desktop Audio Device: Choose the audio source you want to capture your computer’s system sounds, such as game audio or background music. Select the preferred device from the dropdown menu.
- Microphone/Auxiliary Audio Device: This option allows you to choose your microphone or any auxiliary audio input, such as a soundboard or virtual audio cable. Make sure you select your preferred device from the dropdown menu.
Optimizing Audio Settings
- Sample Rate: Setting a higher sample rate is the best option as this improves audio fidelity. For Twitch streaming, a sample rate of 48 kHz is recommended for balanced quality without putting excessive strain on bandwidth.
- Channels: Twitch streams are typically broadcasted in stereo. Select “Stereo” for a rich and immersive audio experience.
- Audio Bitrate: This setting determines the quality of your audio stream. Twitch allows a maximum audio bitrate of 160 kbps, but you would want to go for a range between 96 kbps and 128 kbps as this is best option for maintaining audio quality while minimizing bandwidth usage. While we have our recommendations on the best settings to consider in this aspect, you might want to tweak your options till you get what works for you. Keep in mind that the higher the Audio Bitrate, the higher your bandwidth usage, you might want to stick to optimum level in this with setting.
- Mic/Auxiliary Audio Settings: Click on the “Mixer” tab within OBS, and for each audio source, adjust the slider to achieve a balanced audio mix. You would want to avoid audio peaking or sounding too faint. To ensure clear and distortion-free audio, you should regularly test and adjust your microphone levels. Keep in mind that the OBS settings are only as good as your audio devices, so having high end audio devices would ensure you get to use the OBS features to their full potential.
- Noise Suppression: OBS Studio comes with built-in noise suppression filters that can minimize background noise without affecting your voice quality. You can tweak the noise suppression level and adjust it until you able to achieve that level where the ambient sounds are adequately reduced without causing distortion.
- Noise Gate: The noise gate setting is included to eliminate unwanted background noise during silent moments. To use this feature, you should set the threshold so that the microphone only activates when you speak. This would prevent distracting background sounds from being transmitted.
- Audio Monitoring: Enabling audio monitoring allows you to hear your audio sources, such as game audio or alerts, while streaming. This is feature come in particularly handy if you want to balance audio levels and ensure everything sounds perfect.
Best OBS Audio Settings for Twitch
Following the guide above you should be able to set up the best OBS Audio Settings for Twitch. However, if you still need some assistance to put things together, we have provided an example of the best OBS audio settings for Twitch:
-
- Sample Rate: 48 kHz
- Channels: Stereo
- Audio Bitrate: 128 kbps
- Microphone Level: Adjusted to avoid peaking and maintain clarity
- Noise Suppression: Set to a level that reduces background noise effectively without introducing distortion
- Noise Gate: Configured to eliminate ambient noise during silent moments
- Audio Monitoring: Enabled for precise audio level adjustments
With these settings, you can expect superb audio quality. Keep in mind that these settings are not set in stone, so you can tweak them till you get the options that work best for you.
Conclusion
By carefully selecting the right devices and optimizing each setting, you’ll create an immersive audio experience.
As you fine-tune your OBS audio settings, you might want to keep your eyes on the balance between your microphone, game audio, and any additional audio sources. You should ensure that none of these elements overpower each other so you can enjoy an immersive streaming experience.


